Bauhaus - Clean Architecture & Portfolio Wordpress Theme
© 2015 Highsea studio.
All rights reserved.
Bauhaus - Clean Architecture & Portfolio Wordpress Theme
© 2015 Highsea studio.
All rights reserved.
Clean Architecture & Portfolio Wordpress Theme
demoThank you for purchasing our product! If you have any questions or suggestions, please feel free to contact us via contact form on our portfolio page.
The theme has several templates that you may use for your needs. They are:
And some words about recommended sizes of the images. They are:
Starting from version 1.2.9 settings for logo can be found on the theme options page under "Logo settings" tab and in the WP Customizer. But only in WP Customizer it is possible to change logo images!
In order to change the logo, please, go to WP Customizer. It can be done either by clicking on "Customize" button on the top admin panel
when you are on the home page or by clicking on Appearance -> Customize link in the admin menu:
Click on Home page settings (this menu item will be visible ONLY if you are on the home page!):
Navigate to Logo settings section.
It is possible to use up to three .png images as logo. Different images in different circumstances.
Logo A is used along with Header layout type 1 - when header with the white background. Actually, Logo A and Logo C can be the same images.
Logo B is used with transparent header
First, you have to set height and width of your logo. The default height is 20px and width is 20px, but you can set your own size. Change the values of the corresponding settings and Save them (hit on "Save & Publish" button). Now reload the page.
It is important to set height and width, save them and reload the page BEFORE crop uploaded images!
Second, click on "Select logo" button for Logo A, Logo B or Logo C settings, upload images, crop them if needed and save settings (hit on "Save & Publish" button).
Why there two logotypes have to be added? Well, Logo A should be a dark version of the logo because the header is white by default, so it will look better if you add something dark:
Now, if you use other logo dimensions than default, you may need to adjust top margin of the menu. Here is an example with custom sized logo:
The default value of the top margin is 23px for Header layout 1 and 37px for Header layout 2. This is how the menu looks like with top margin set to 60px:
Make a home page like in our demo is pretty simple. First, create a static page and choose 'Home page' template for this page. Then choose 'a static page' option for Front Page displays setting and choose your previously created static page:
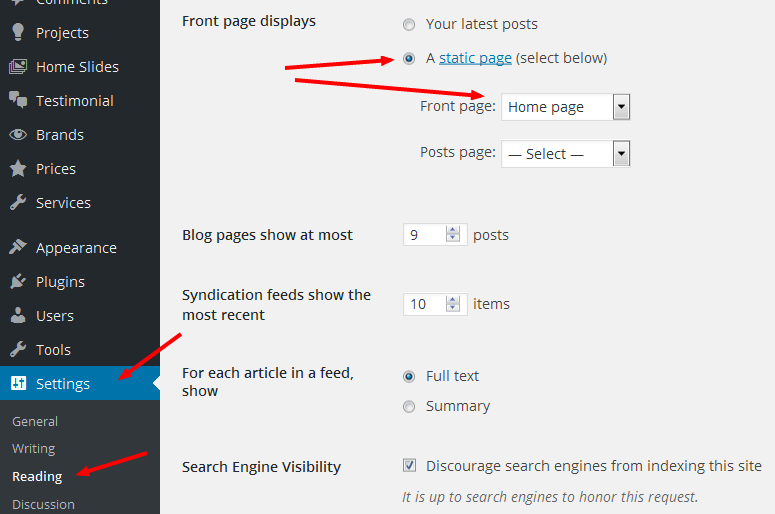
Save the changes and you are done!
The homepage can be configured on the theme options page (it can be found under Appearance -> Theme Options item of the admin menu).
Among sections for the homepage are: simple slider, two sections to display "about us" information (content can be added via theme options page), a unique grid with 6 projects (can be chosen by using checkboxes), a unique grid with 6 items of custom content (content can be added via theme options page), "Our Services" block, block with testimonials, block with brands/logotypes, block with a map and contact information. All these blocks can be enabled/disabled via theme options page on "Home" page settings" tab.
First of all create a page and choose template 'About Page'. Featured image will be added to the page header in the background. You should also add a title and subtitle (via metabox). Than add a title for "Our story" block and content for the left and the right columns (via metabox).
Also, you can enable "Meet Our Team" block (explained below), "Our Partners" block (explained below) and block with Instagram images (you must activate 'Instagram Feed' plugin (free) to be able to use this block!)
Important: 'Uni Profilini' plugin (bundled with the theme) must be activated in order to use this feature!
The theme creates a new special user role called 'architector'. All users under this role will be shown in this block on 'About' page. So, first of all choose 'architector' role for some users and add an avatar and fill in their profession in their profiles:
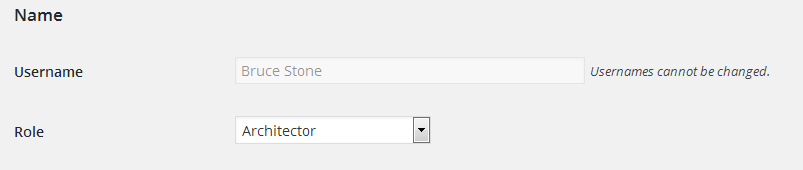
You have to activate/deactivate the theme if you don't see 'Architector' role in the dropdown.
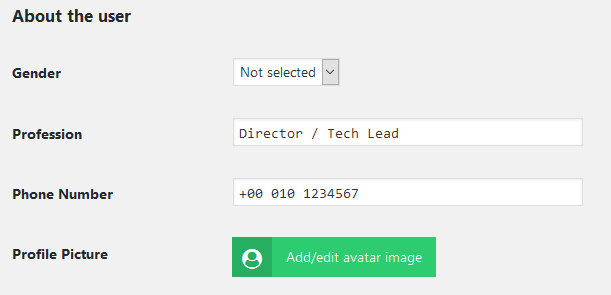
Here you can add a photo, profession and phone number. Also you can add some info about a person in 'Biographical Info' textarea (some html tags are allowed: a, br, em, strong).
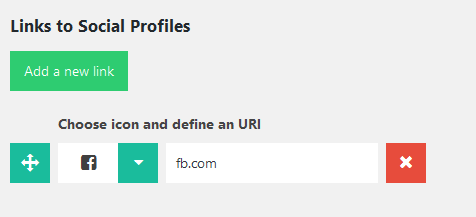
Additionally, you can add social icons. Choose an icon and define an URI and save changes.
Now enable "Meet the team" block on "About" page. Also, you can add custom title for this block.
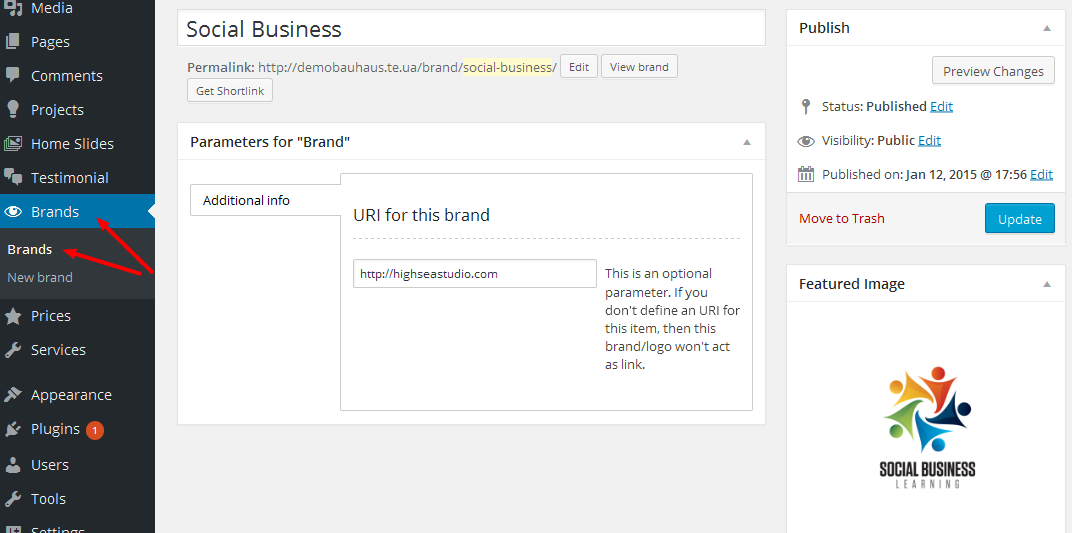
Special Brand CPT is used to give you a possibility to showcase your partners/brands that you work with.
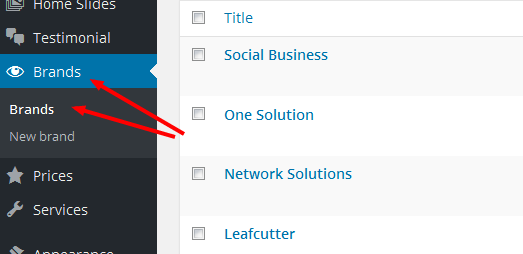
All these brands will be shown in this block. For more information about brands please read this section.
Important: you have to activate plugin 'Uni Custom Post Types and Taxonomies' (bundled with the theme) to use this feature!
The theme has simple slider built-in. Slides of this slider are posts of Home Slides CPT.
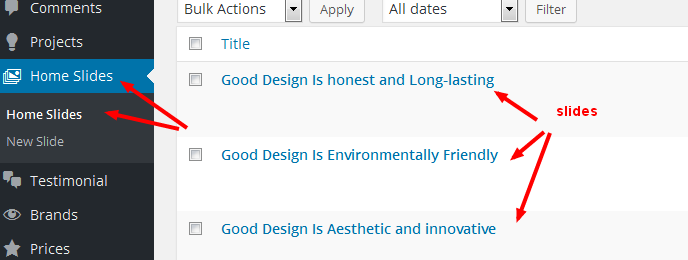
The number of slides which can be shown is unlimited. All published posts of Home Slides CPT will be shown in the slider. To hide a slide just draft related post.
We recommend to use 'Intuitive Custom Post Order' plugin to reoder posts. Posts on the top will be shown first in the slider.
Important: you have to activate plugin 'Uni Custom Post Types and Taxonomies' (bundled with the theme) to use this feature!
The theme has four types of portfolio pages and you can choose any of them. They all are page templates, so you have to create a regular page first, then choose one of the portfolio page's templates on your choice:
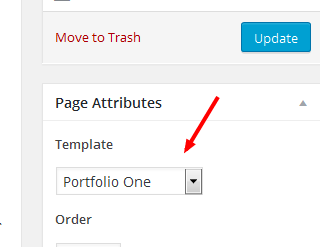
Save and publish this page. Now this is your portfolio page. All the published posts-projects will be displayed automatically on this page. By "all" I mean really all of them! Also, you have an option to choose what projects to display on this page - just check needed in the metabox to this page. Important: Portfolio One temlate doesn't have such an option!
Now, it is a time to create single projects. You can do this by using Project CPT:
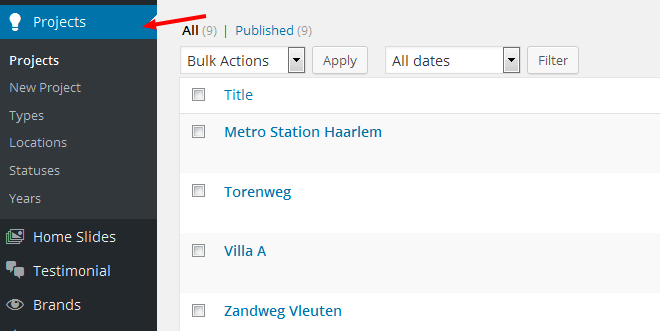
You can add 'type', 'location', 'year' and 'status' for every project. These custom taxonomies are used in the filter on "Portfolio One" page template. So, by assigning your prject-posts to these taxonomies, you will be able to filter projects by them on "Portfolio One" page template. Other portfolio page templates are not using them in any way.
Every project has set of custom fields:
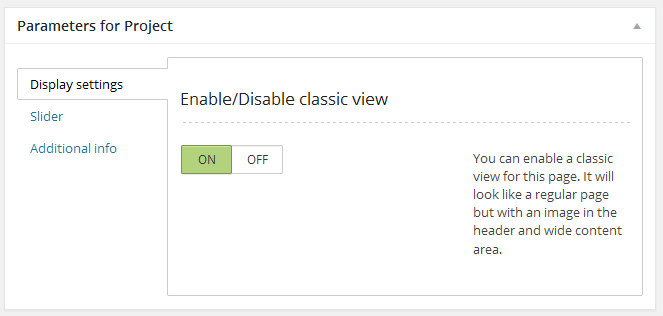
Enable/Disable classic view on "Display settings" tab can be used to enable a classic view for this page. The page will look like a regular page but with an image in the header and wide content area. You have a complete control over how your page will look like and we recommend to use shortcodes of UltimateShortcode plugin to achieve a better result. Page header image is a 'feature image' of this post. Here is an example of such page view: http://highseastudio.com/demo/bauhaus/project/metro-station-haarlem/ However, it is disabled by default, so your project pages will look like this http://highseastudio.com/demo/bauhaus/project/moore-park-residence-by-drew-mandel/ by default.
Images for slider on "Slider" tab can be used to add images for project's slider in non-classic view mode.
On "Additional info" tab you can define some otehr parameters. They are pretty self explanatory.
Important: you have to activate plugin 'Uni Custom Post Types and Taxonomies' (bundled with the theme) to use this feature!
The theme uses posts of Service CPT. This CPT is created to help you showcase, for instance, services of your studio.

Each post of Services CPT has four options:
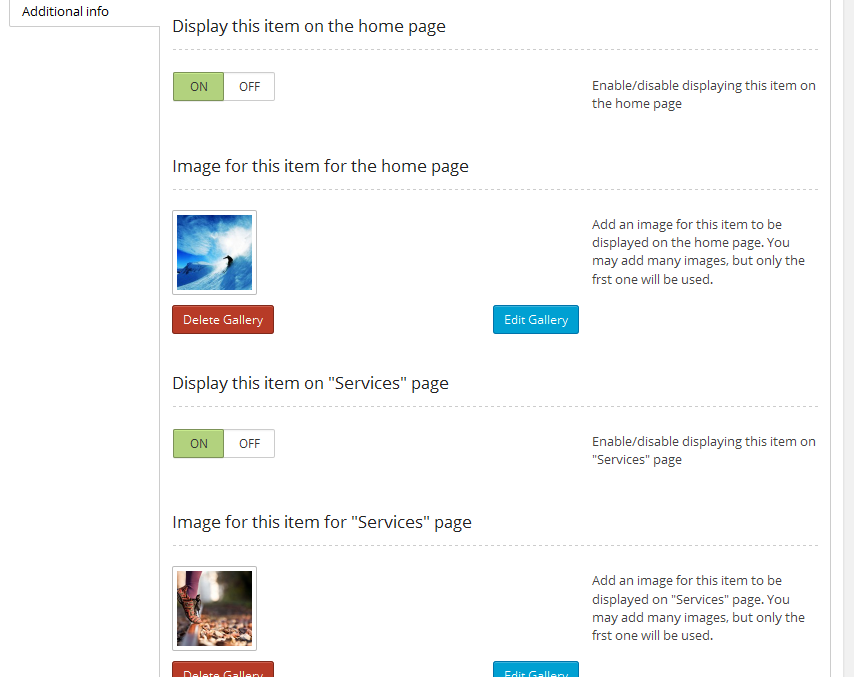
So, you can display services on per post basis on the home page and/or on page with "Services" template and use different images in different places.
Page with "Services" template is just a page with "Services Page" template chosen. This page displays prices (3 or 4) at the top of the page and they look like this:
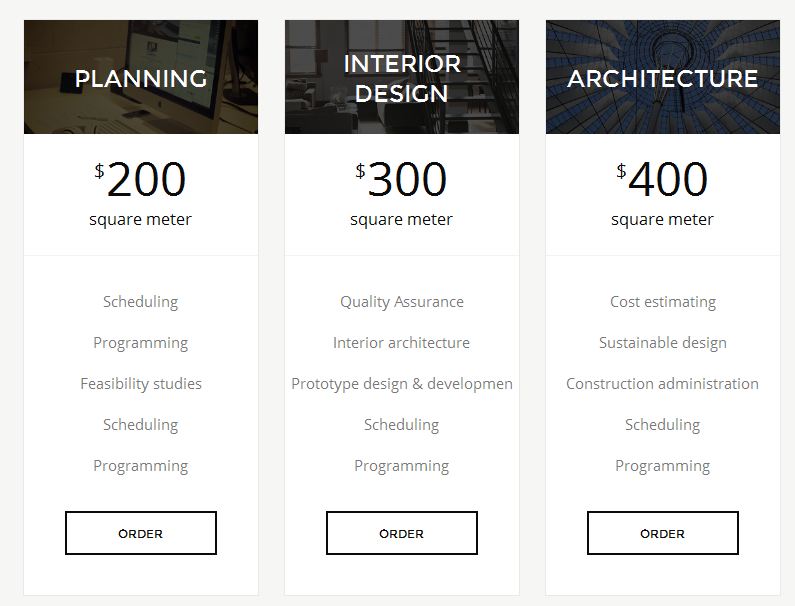
Please, read more about prices and Price CPT here. Also this page displays services at the bottom of the page.
We advise to use plugin like 'Intuitive Custom Post Order'. You will be able to sort posts with this plugin.
Important: you have to activate plugin 'Uni Custom Post Types and Taxonomies' (bundled with the theme) to use this feature!
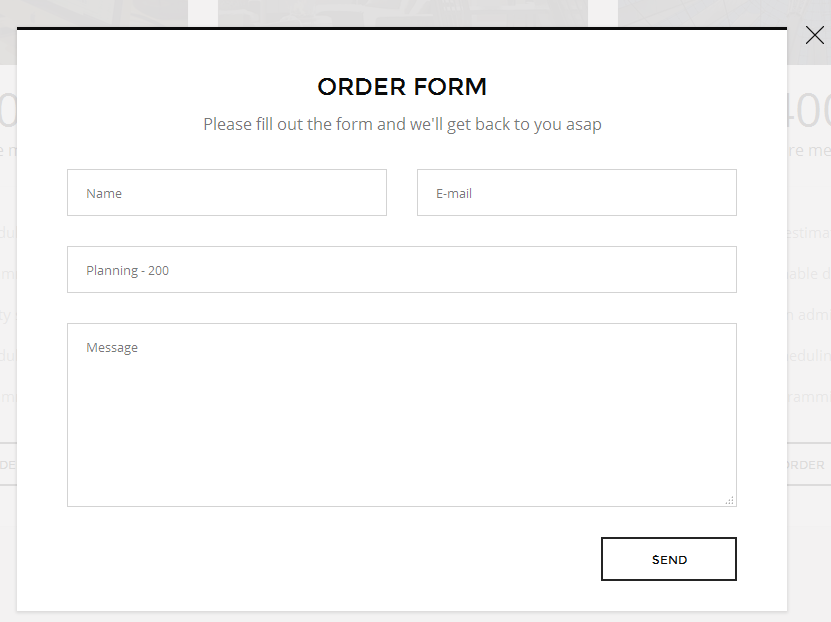
The theme uses posts of Testimonial CPT. This CPT is created to help you showcase, for instance, feedback from your partners or clients.
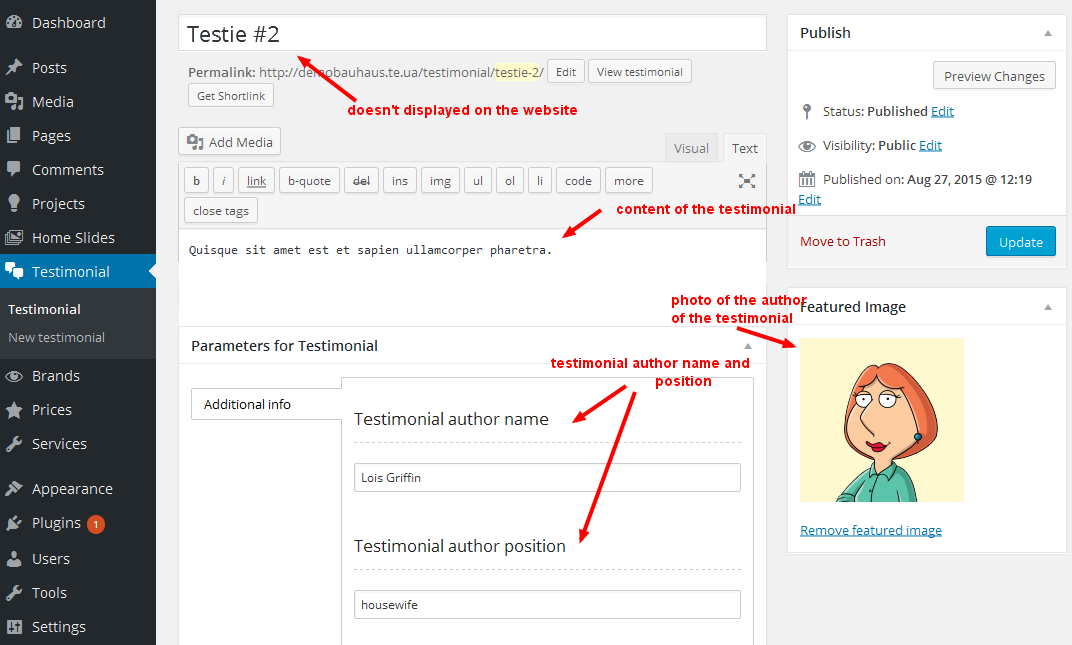
The information in metabox will be shown on the website and also will be used in th Order form:
All published posts of Testiomonial CPT will be shown on the home page in the section with testimonials.
We advise to use plugin like 'Intuitive Custom Post Order'. You will be able to sort posts with this plugin.
Important: you have to activate plugin 'Uni Custom Post Types and Taxonomies' (bundled with the theme) to use this feature!
The theme uses posts of Price CPT. This CPT is created to help you showcase, for instance, what you can do and costs of these works.
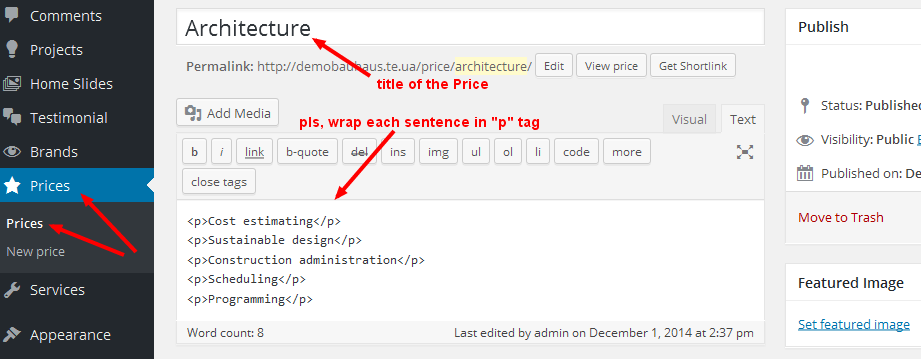

This prices can be displayed on special "Services" page. Yo ucan display 3 or 4 prices at once.
Important: you have to activate plugin 'Uni Custom Post Types and Taxonomies' (bundled with the theme) to use this feature!
The theme uses posts of Brand CPT. This CPT is created to help you showcase, for instance, your partners or clients.
There is one global option that is connected with posts of Brand CPT:
This option works for both section with brands on home page and section with brands on "About" page and turns all your brand images into black and white. We think, B&W logotypes look better :)
Header layout. You can swicth between Layout 1 (header with a white background) and Layout 2 (header with a transparent background). Important: different header layouts option works ONLY for "Home" page template. On all other pages a header with a white background will be shown! This is how Layout 1 looks like:

And this is how Layout 2 looks like:

Style of archive pages. Choose a style of archive pages (categories, tags)
Enable/Disable displaying similar posts on single. This is a global option and it works for the whole website. Posts which are similar by tags can be displayed below post content.
Portfolio page. Select your Portfolio page. A link to this page will be added to the special icon on the slider on single project page. This is a global option and it can be overriden on per project basis.
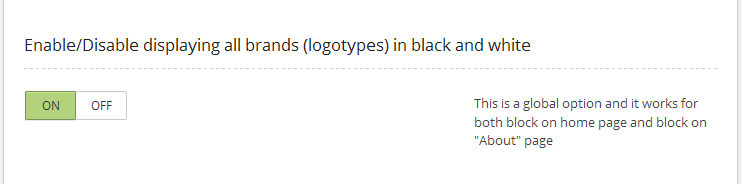
Enable/Disable displaying all brands (logotypes) in black and white. This is a global option and it works for both block on home page and block on "About" page
Enable filter by types of projects
Enable filter by locations of projects
Enable filter by statuses of projects
Enable filter by years of projects
Text in the footer. Add your own text to the footer
You can upload three files. Each of them can be in different style. "Logo A" will be used if you choose Header Layout 1. It is also better if "Logo B" will be with white (light in general) colour outlines and "Logo C" will be with black (dark in general) colour outlines. Also, you are able to define custom height as well as custom top margins for the main menu for both header style #1 and header style #2.
You can define custom Google fonts here. Please, use the first for regular text and the second for headings. Default are: Montserrat (700, regular) and Open Sans (700, 300, regular)
Enable/Disable simple slider.
Enable/Disable "About Us" block #1.
Enable/Disable "About Us" block #2.
Show/hide the grid with custom content on home page. A unique grid with custom content on home page. Total are 6 items, but you may also display first three items or second three items separately. Important: in order to show the first three items you have to add URIs for the first three items. The same is for the second three items. It means that you can not just display first and fourth items, for instance. Only by three items at once and only first three or second three or all six items. Also, the second and the sixth items haven't fields for text.
Enable/Disable "Our Services" block.
Enable/Disable block with testimonials.
Enable/Disable block with brands.
Enable/Disable block with a map and contact information.
You can add Google Map coordinates for the map on "Contact" page and address, phone number etc. Actually, you cannot change the map marker icon easily, but you can change its colour here.
The theme has its own working contact form. However you can also activate Contact Form 7 plugin and use forms provided by this plugin. In this case you just need to add the ID of the CF7 form.
Facebook application ID. Create an application on https://developers.facebook.com/ and add its ID here. It is used in fb share link on a single project page.
You can add links to your social profiles here.
There is some required and some recommended plugins. All the required plugins are bundled with the theme and only required plugins affect the basic functionality of the theme. Recommended plugins just add some additional functionality, they are not neccessary and some of them are not bundled with the theme. You can buy them or download for free (it depends on the particular plugin). 'Recommended' means that we tested how they work with the theme just to be sure that everything will be ok and we think that they can be useful in some particular situations.
Some of the required plugins are paid and bundled with the theme, like 'Uni User Avatar', so you can use them with ease.
This is the video tutorial which shows how to import Bauhaus WP theme demo content and make some basic configurations:
And this is the text version:
Appearance -> Themes and activate Bauhaus themeTools -> Import and install WordPress Importer pluginUsers -> All users, choose all users with 'Subscriber' role and change their
role to ArchitectorAppearance -> Themes and activate Bauhaus child themeOptionTree -> Settings -> Importsettings.txt file and paste it to 'Settings' textarea
and click "Import settings"theme_options.txt file and paste it to 'Theme options'
textarea and click "Import theme options"Appearance -> Customize and make final adjustements shown in the video.Install and activate Polylang plugin. The theme fully supports this plugin for making multi language web sites and we recommend to use it. In our opinion, it is fast, easy to configure and reliable plugin for such a purpose.
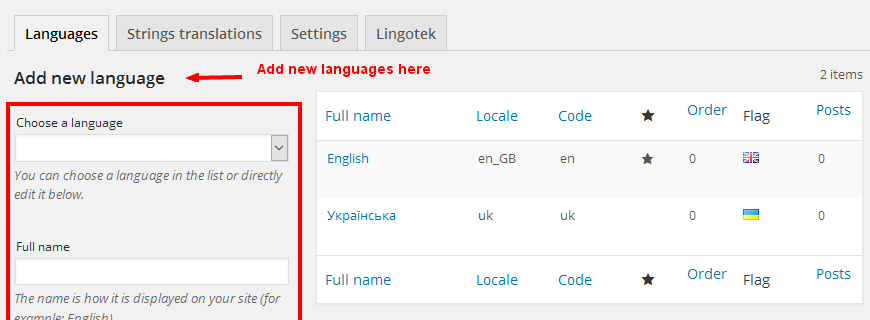
Go to Settings -> Languages admin page and add default and additional language(s):
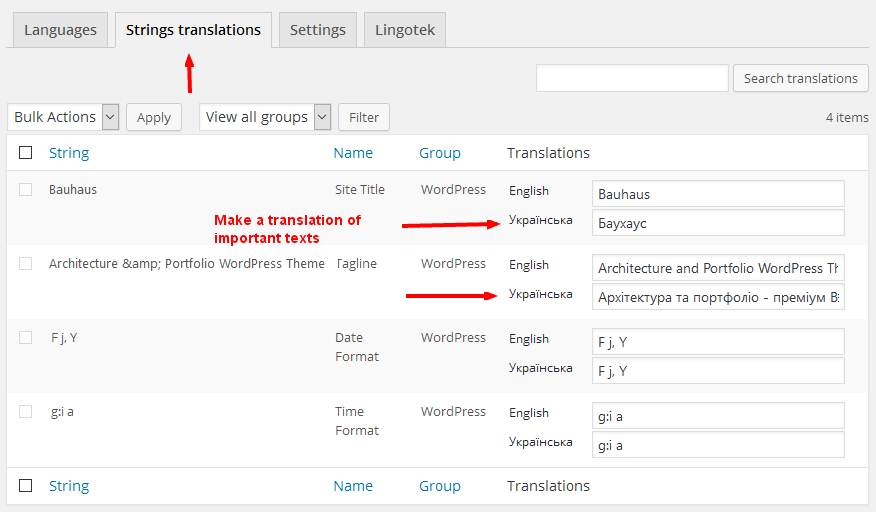
Go to the second tab and translate global texts:
Now it is a time to set all the existed content to the default language. You can see this notice when you are on
Settings -> Languages admin page

Now it is the time to add and save theme options for each of the languages of the website. You have to switch the certain language first, change options then:
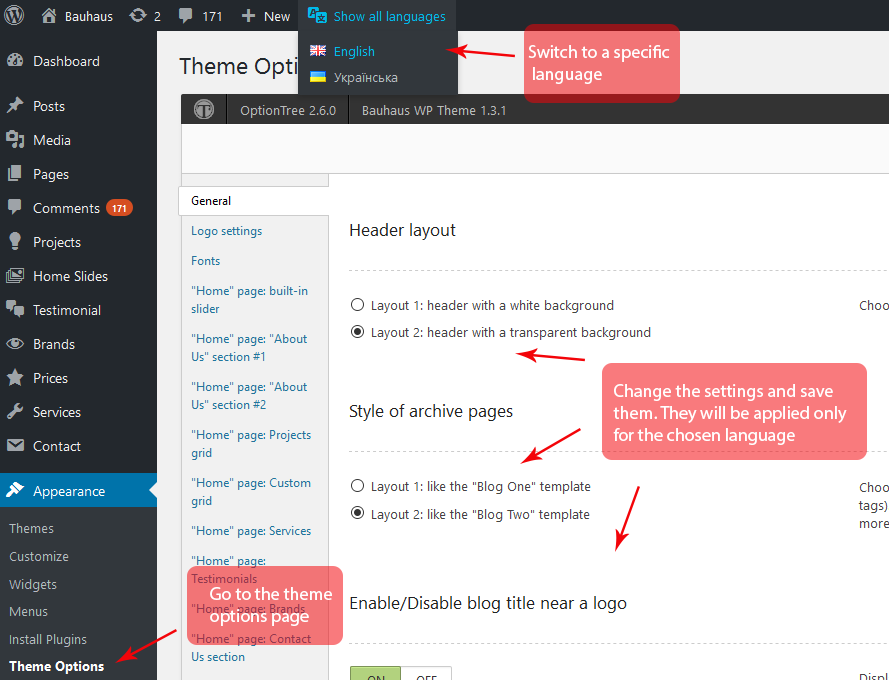
These settings will be applied for the chosen language only! It means, that you can have different settings for different languages. Now, add these settings and save them for any other language on your website.
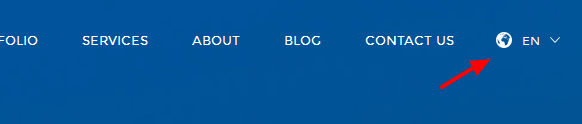
You don't need to worry about adding the language switcher to the top menu - it will be added automatically:
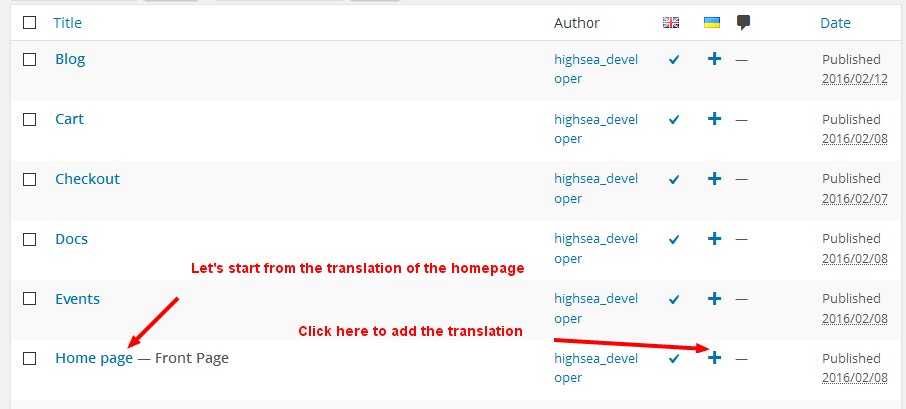
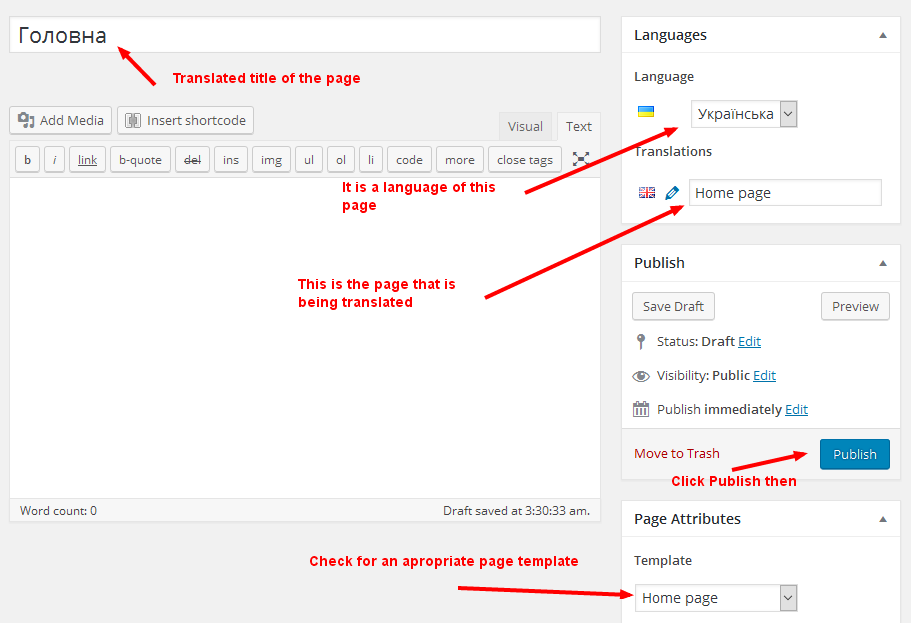
Now it is time to translate the home page:
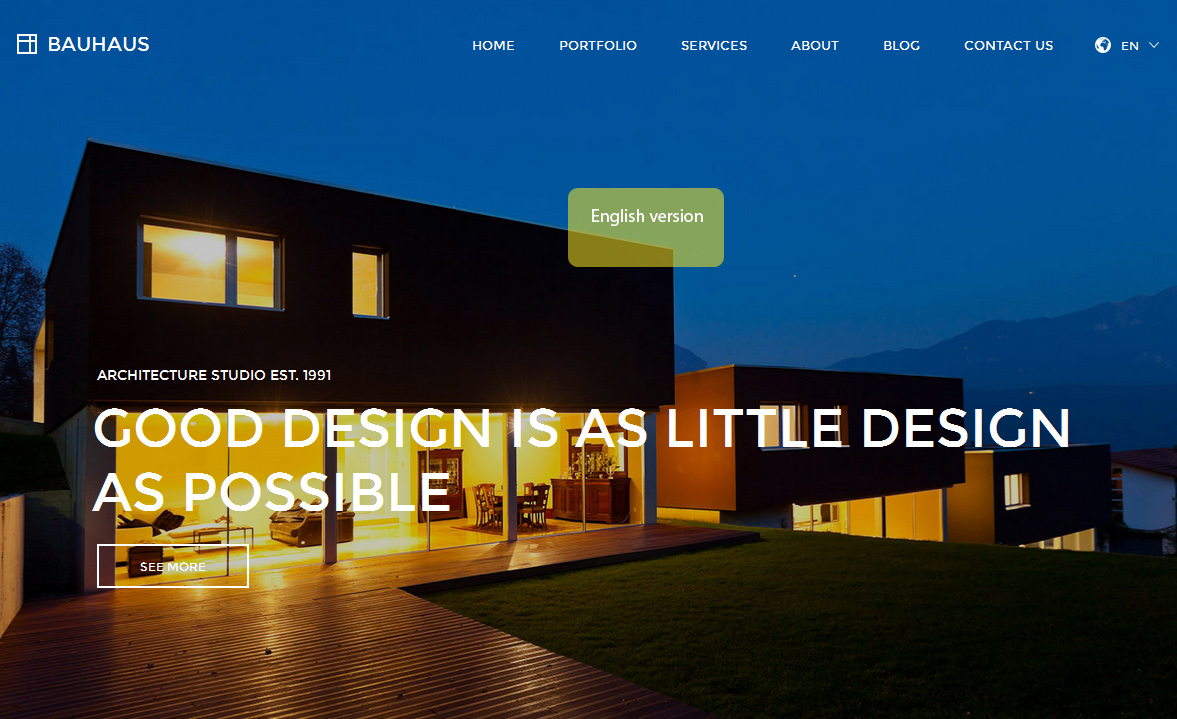
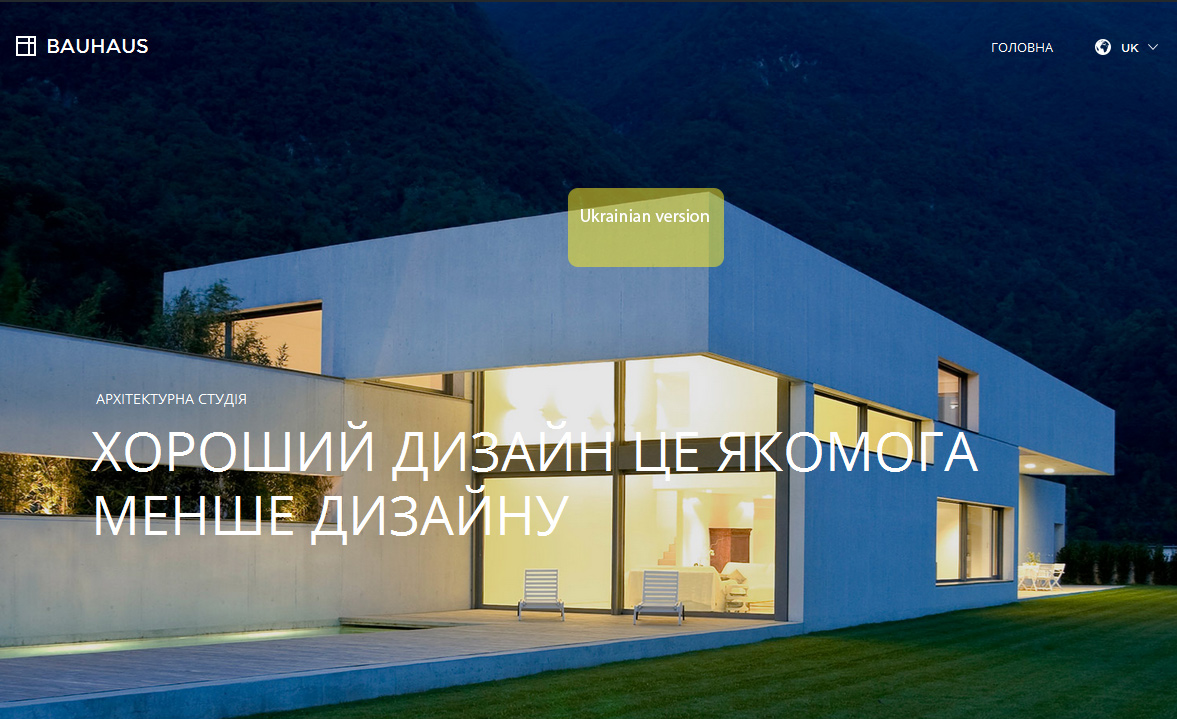
Let's review the results:
You can translate the rest of the content - posts, pages etc - in the same way.
Step by step we migrate all our theme's options from the separate page in the admin area to WP Customizer. Some options are available only in WP Customizer. For example, logo settings. Sometimes it is needed to have different versions of the logotype for different languages. It is possible to achieve that! Please, follow these steps in case you need to add different logos for different languages and to save language specific settings via WP Customizer in general:
Repeat steps 3 and 4 for any other languages you have.
For more information about the using of Polylang and FAQ, proceed to Polylang WP plugin official web site
Appearance -> Customise in admin menu) and click on
Site Identity menu link. You will see "Site icon" option. Click on "Select image" and follow on screen instructions.A: I recommend to use PoEdit or EazyPo software to make a translation. For example, run PoEdit and choose 'New from POT/PO file...' and choose bauhaus.pot (located within 'languages' folder in the theme's folder). The software will ask you to choose a language of the translation. Choose your language and translate all the strings. Click 'Save' after the translation has been made and save your progress in a file with the same name as original .pot file but with addition of your language tag. Examples: bauhaus-pl.po, bauhaus-pt_PT.po. A .mo file with the same name will be added automatically. After that you have two place your newly created files .po and .mo into 'wp-content/languages/themes' folder (create this folder if needed). Now your translation is in safe place and will not be deleted on the theme update.